Rust has a sneaky way of showing up when you’re not looking. One day your garden tools, patio furniture, mailbox, and bike chains look fine, and the next time you see them, they’re rusty. Rust starts when wetness or humidity leaves an invisible film of moisture on bare or scratched metal. Once it starts, it spreads fast.
The good news: you can remove rust from metal at almost any stage, but you have to use the right method for the kind of rust you have.
This guide walks you through the main rust removal methods (mechanical, chemical, and electrolysis), explains when a rust converter is the smarter choice, and shows how to stop rust from coming back.
Disclaimer: BEEST manufactures Rust Converter Plus mentioned in this guide. We developed it specifically for stabilizing rust and preparing metal surfaces for long-term protection, and this article reflects our experience working with common rust removal scenarios.
Understanding Rust: Surface Rust vs Heavy Corrosion
Before you decide if you are going to try to do something about the rust, you need to decide what type of rust it is.
Surface rust
Surface rust is light orange-brown film and is most common for homeowners. The metal underneath is still solid. You would find this on items like garden tools that were stored or left outside, patio furniture, and maybe even garage door tracks. Your best option here is sanding, using a wire brush, abrasive pads, rust-remover gels, or light chemical treatments.
Scale rust – moderate
Scale rust is thicker rust that is rough and starts to flake off. You might find this type of rust on mower decks, outdoor railings, or metal shelving in damp sheds. Your best options for removing this level of rust are more aggressive brushing, heavier chemical treatments, or a rust converter or coating product.
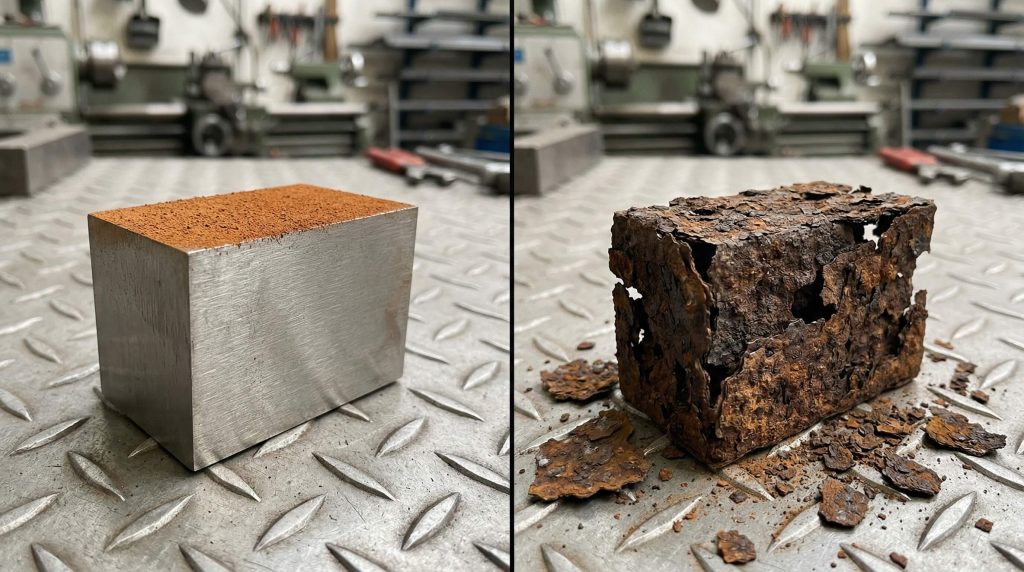
Heavy corrosion
This type of rust results in deep pitting, soft spots, or metal that looks crumbly. In the case of heavy rust, you need grinding, sandblasting, or replacement. Converting and coating can help in some areas of rust, but you will not be able to restore missing metal. In many cases, replacement is necessary.
Safety First: PPE, Ventilation, and Storm Drains
Before dealing with any level of rust, it is important to use personal, protective equipment or PPE. Removing even surface rust could involve flying debris, abrasive dust, or chemicals.
PPE basics for most projects, even surface level rust projects should include:
- Gloves (chemical-resistant if using acids or solvents)
- Eye protection (metal chips could fly when sanding, brushing, or grinding)
- Long sleeves if you’re grinding or using chemicals
- Dust mask/respirator when sanding or grinding
- Good ventilation if you’re using acids, aerosols, or strong solvents
Keep it out of runoff
Try not to rinse chemical residue into a driveway drain or the street. Lay down cardboard, use a catch bucket, and wipe instead of rinsing when possible. Dispose of any waste responsibly.
The Rust Removal Decision: Choose Your Method
Here’s the simple way to determine how you should remove your rust:
If you need bare metal for welding, polishing, or a perfect paint finish
Go mechanical first, then do a light chemical step for pits or seams, then prime.
If you’re working on lots of nooks, bolts, brackets, or ornate shapes
Use a chemical gel/soak or electrolysis for parts.
If you can’t realistically remove every speck of rust
(Pitted metal, seams, textured cast iron, railings)
That’s often when a rust converter makes sense before painting.
If it’s a big outdoor item (fence, trailer, equipment)
The most realistic method is usually:
mechanical removal, then a rust converter, followed by paint
This is the “best effort meets real life” route, and it works well when you do the steps in order.
Mechanical Rust Removal
Mechanical rust removal is exactly what it sounds like: physically scraping, sanding, or grinding rust off the metal.
Good tools to use
- Hand tools: wire brush, scraper, abrasive pads
- Sanding: 80–120 grit for removal, 180–220 to smooth
- Drill wire brush: good for medium jobs
- Angle grinder wire cup: fast, messy, effective
- Flap disc: great balance of removal + smoothing
- Media blasting (sandblasting): fastest for heavy rust and best prep surface for coatings
Pros
- Fast
- Cheap to start
- Works on just about anything with enough effort
Cons
- Dusty and loud
- Easy to gouge metal if you go too hard
- Doesn’t always reach pits and seams
- Can leave rust ghosts that show up later under paint
Practical tip: Mechanical first, then a chemical step or converter. With most rust removal projects, even light ones, it is helpful to gently brush over the surface before applying any type of chemical or converter.
5) Chemical Rust Removal
Chemical methods are nice because they can get into tight areas your brush can’t. They are easy to control and great for detail work.
There are two chemical types: rust removers which lift or dissolve rust and rust converters that convert what is left into a stable layer. This section is mostly about removers. Converters will have their own section.
A) Mild acids are good for light rust
- Vinegar (acetic acid): slow and cheap, works on small items
- Citric acid: popular for tools/parts, less harsh smell than vinegar
Best for: hand tools, bolts, small parts, surface rust. But they can darken the metal and could cause flash rust after rinsing if they are not dried and protected.
B) Store-bought rust removers – gels and soaks
These are usually easier than homemade acids above because they cling and work evenly.
Best for: gels are ideal for vertical surfaces, and these products are great for people who say, “I want results within an hour.” They also provide controlled applications
C) Phosphoric acid – removal and prep
Phosphoric acid is commonly used because it reacts with rust and can help prep metal before paint.
Best for: after brushing and to treat remaining oxidation in pits and seams. Also ideal for surface prep before primer or paint. But follow the label closely and realize that some types require rinsing or neutralizing while others do not.
Flash rust: the classic surprise
You rinse, it looks clean, and then the metal turns orange again.
That’s not you failing. Bare steel oxidizes quickly, especially with humidity so to avoid flash rust, dry thoroughly, and prime, oil, or convert shortly after.
Electrolysis Rust Removal
Electrolysis is a favorite for restoring tools and parts because it removes rust without removing as much base metal as aggressive grinding can.
What it is:
You submerge the rusty part in a solution, run DC current, and rust migrates away from the part.
Many setups use washing soda or sodium carbonate in water and a battery charger.
When electrolysis is worth it
- Lots of small parts (bolts, brackets, vintage tools)
- Intricate shapes where brushing is tedious
- You want to preserve markings or edges
When it’s not worth it
- Huge objects you can’t submerge
- When you need it done quickly
- When you’re not set up to do it safely
Safety note: electrolysis produces gas bubbles. Ventilate, follow safe setup practices, and don’t wing it.
When a Rust Converter Beats Rust Removal
Cutting Edge Rust Converter
Sometimes you won’t get to shiny bare metal, no matter how much you scrub or brush. Rust hides in pits, seams, texture, and scratches or craters.
That’s when a rust converter can be the smarter move.
Use a rust converter when:
- Rust is “tight” (not flaking off in sheets)
- The metal is pitted and you can’t reach bright steel everywhere
- You’re prepping for paint and want extra protection
- It’s outdoor metal that will keep getting moisture exposure
A converter doesn’t “erase” rust like a remover does. It stabilizes what remains so you can coat over it.
This is exactly where a product like BEEST Rapid Rust Converter+ work best:
- after you’ve removed loose rust
- before you prime/paint
- especially on outdoor items like fences, trailers, equipment, railings, gates, and steel/iron surfaces that live a rough life
It’s not magic. It’s a practical bridge between “rusty” and “ready to coat.”
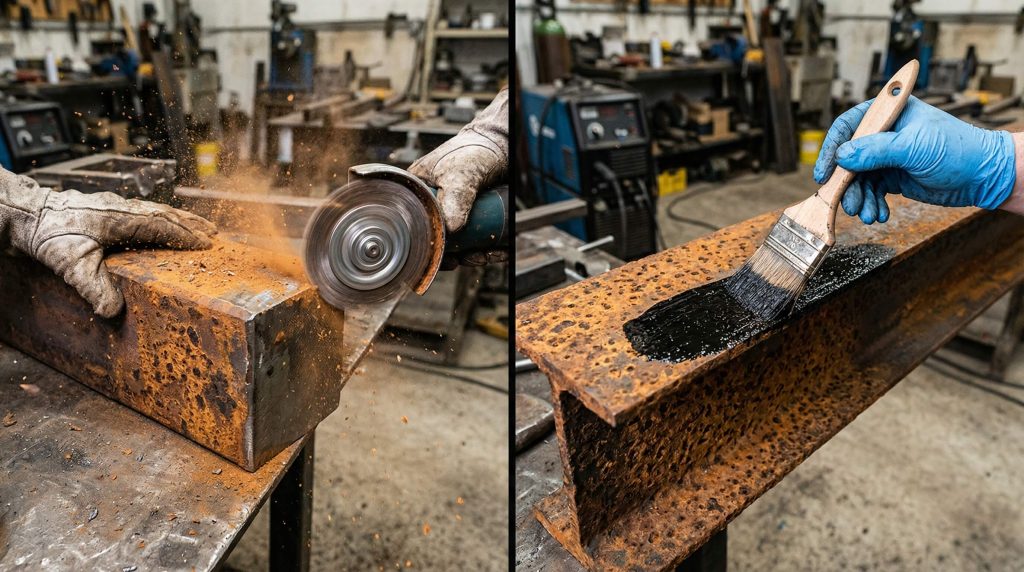
How to Use a Rust Converter Correctly
A rust converter is only as good as the prep. Think of it like painting: if the surface is oily, flaky, or dirty, nothing sticks well.
Step-by-step
- Remove loose rust and flaking paint with a wire brush or scraper for a smoother surface.
- Clean and degrease so dirt and oil don’t block bonding. Wipe and let dry.
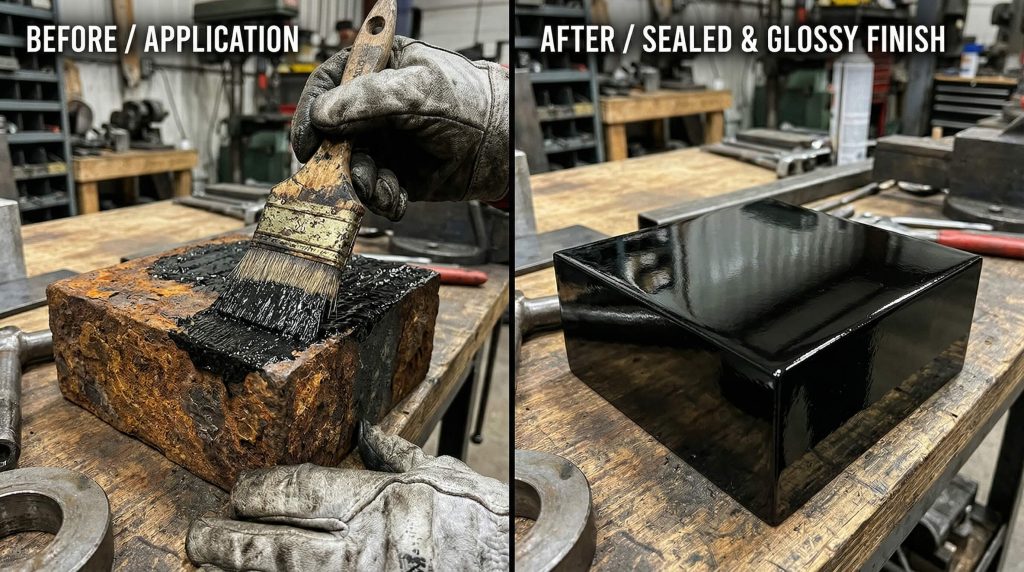
- Apply the converter evenly
- Give it enough time and do not rush it. Rushing is a common mistake.
- Topcoat if required as is best with most converters for durability and protection
Common mistakes when using a converter include applying over greasy metal, leaving rust behind, painting too soon, and failing to brush initially to remove flakes of rust before applying the converter.
Buyer’s Guide: How to Choose Rust Removal Products
Rust products all look confident on the label. Here’s how to choose what will work best for your needs.
A) Choose by your goal
- Want bare metal?
Mechanical, rust remover, then prime quickly - Want to stabilize and paint?
Rust converter, then paint or coat - Restoring parts?Soak removers or electrolysis. Protect afterward
B) Choose by surface and shape
- Flat panels: sanding and prep chemical
- Intricate parts: soak, gel, electrolysis
- Vertical surfaces: gels and sprays are better than liquids
C) Compatibility matters more than hype
The key question is: Can I paint over it, and with what?
Read the label and search for projects the product was used on.
D) If you’re shopping for a rust converter, look for:
- Clear prep instructions
- Cure time guidance
- Paint compatibility guidance
- Indoor/outdoor clarity
- “If you’re converting rust on iron/steel before priming and painting, a converter like BEEST Rapid Rust Converter+ is ideal
Real Customer Results Using Rust Converter Plus
Garage Door Hardware — Columbus, OH
Mike noticed rust forming on his garage door hinges and brackets after years of exposure to moisture. After wire-brushing loose rust and applyingRust Converter +, the surface turned dark within hours and stopped flaking. He painted over it the next day, and the hardware has remained rust-free through multiple seasons.
Metal Fence Restoration — San Antonio, TX
After heavy rain and humidity caused rust spots across a backyard metal fence, Laura used Rust Converter + instead of sanding everything down. The converter stabilized the rust and created a paint-ready surface, saving hours of prep and preventing further spread.
Prevention: How to Stop Rust From Returning
Rust removal is half the battle and the other half is stopping it from returning
Common protection plans
- Primer and paint is probably the most common
- Direct-to-metal coatings depending on the project
- Oil/wax protectant on tools and parts that you would not paint
- Grease/protective film on hidden areas like undercarriage
Prevention tips that actually work
- Keep metal clean and dry when possible
- Don’t store tools in damp areas
- Touch up chips and scratches quickly
- Use proper primer for metal and outdoors
- Don’t paint over wet metal or trap moisture under coatings
Common Problems People Ask About
“Rust came back right after I cleaned it”
That’s usually flash rust, especially after rinsing. Dry thoroughly and protect quickly with a primer, oil, or converter
“Rust remover turned the metal dark. Did I ruin it?”
Not necessarily. Some chemical processes darken metal. What matters is whether the surface is stable and ready for the next step.
“Can I paint right over rust?”
If it’s flaking, do not paint over it. But if it’s stabilized, a converter that says it can be painted over, then yes.
“My paint peeled after using a converter”
If this happens it was most likely do to poor degreasing or cleaning, not waiting until the converter was fully cured, using the wrong topcoat, or leaving loose rust prior to applying the converter.
“Do rust converters actually work?”
They can, especially when used as part of a full prep-and-coat process. They’re not a replacement for prep. They’re a necessary step when full removal isn’t realistic.
FAQ: Rust Removal, Rust Converter, Remove Rust from Metal
For most DIY jobs: use a wire brush, flap disc on an angle grinder, or sanding to remove loose rust, then clean the surface thoroughly and apply a rust-inhibiting primer followed by paint. For heavy or widespread rust, media blasting (sand, soda, or walnut) or aggressive grinding is the fastest method to get back to bare metal quickly.
For hand tools, small parts, or precision items: soak in a commercial rust remover (like Evapo-Rust or Naval Jelly), use citric acid solution (cheap and effective), or set up electrolysis for deep rust removal without damaging the metal. After removal, dry immediately, then protect with oil, wax, or a clear rust-preventive coating to stop flash rust.
Rust removers work best when you want to get as close as possible to bare metal for a clean repaint or when rust is light to moderate. Rust converters work best when rust is in pits, seams, or hard-to-reach areas — they chemically convert rust into a stable, paintable surface instead of removing it entirely, saving time on prep.
Not without prep. Heavy flaky or loose rust must be removed first by wire brushing, scraping, or sanding. Rust converters need a stable, firmly attached rust layer to react properly — applying over loose rust will lead to poor adhesion and failure over time.
Usually yes. Most rust converters leave a primed-like surface, but you should follow the product label — many recommend a compatible topcoat or primer for best long-term protection. Always apply a quality rust-inhibiting primer and paint afterward for maximum durability, especially outdoors.
The best prevention is good surface prep (remove all loose rust), apply a rust-inhibiting primer, then a quality protective paint or coating (e.g., epoxy, polyurethane, or rust-preventive spray). Keep metal dry when possible, touch up chips or scratches early, and consider sacrificial coatings (zinc-rich primers) or galvanizing for high-exposure items.
Quick Checklist + Conclusion
The Common Checklist
- Identify rust level: surface, scale, or heavy corrosion
- Remove loose rust mechanically
- Clean/degrease
- Choose: remove (chemical) or convert (rust converter)
- Dry fully
- Protect: primer/paint or appropriate coating
- Maintain: touch up chips early
Rust is persistent, but we do know how it forms and how to get rid of it. Once you match the removal method to the type of rust you actually have, you will be able to follow a step by step process to remove or subdue the rust. With the correct product and helpful tools, rust will be a problem you can tackle.
Author Bio: Kimberly Schuyler – info? Not sure if I should be listed as landscape/maintenance expert as well as a home improvement/rust aficionado
Published: February 2, 2026
Last updated: February 2, 2026