
Learn which landscape adhesive you need for gravel, river rock, mulch, bark, or pine straw. Compare best uses, application steps, dry time, and pros/cons.
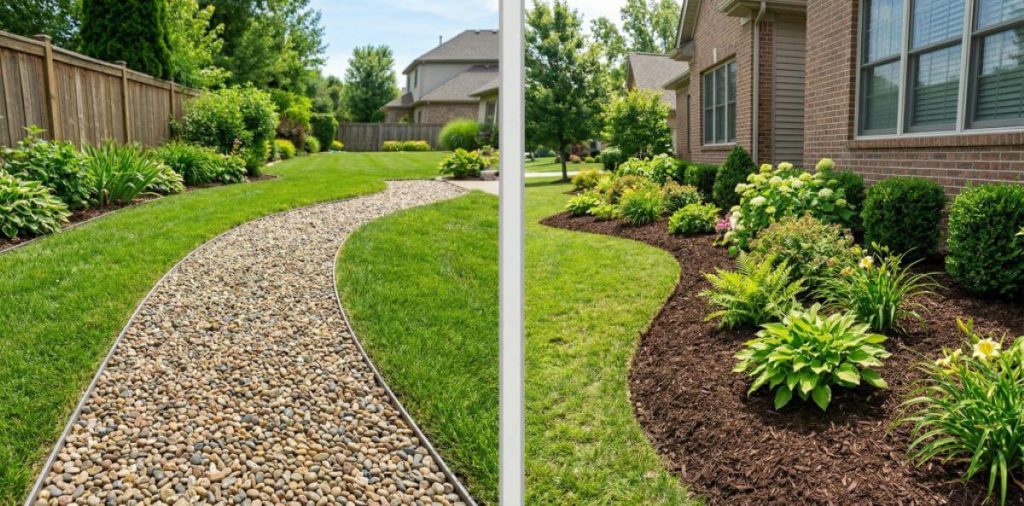
If you love a lawn and landscape with color, texture, and personality, but you don’t want to spend every weekend chasing mulch and re-sweeping gravel, there are a few trending products that can help keep everything looking sharp with a whole lot less upkeep.
Have you heard landscape adhesives, a.k.a. rock glue, mulch glue, mulch stabilizer, gravel binder, river rock glue, and DIY landscape edging? These solutions are designed to hold or bond a variety of landscape materials – think mulch in flower beds, decorative stone around the patio, or pine straw around a tree base. Rock glues and other rock adhesives are designed to hold or bond heavier materials like stone, pebbles, and gravel, while mulch glues and mulch adhesives are ideal for lighter materials such as tan bark, wood chips, or pine straw. Both are water permeable and can give you the look you want, while simultaneously eliminating continual maintenance and clean-up. Ultimately, you’ll get tidier landscape areas that require less work.
If this has piqued your interest, read on to discover everything you need to know about these trending products such as PetraMax Rock Glue and PetraMax Mulch Glue. By the end of this article, you’ll have a solid understanding of landscape adhesives, so you’ll be able to make a wise choice for your needs.
Buy ProductNote: PetraMax manufactures both Rock Glue and Mulch Glue discussed in this guide. We created these products specifically for common landscaping use cases and are sharing our expertise to help you choose the right adhesive for your project.
Quick Answer: Pick This If…
Choose Rock Glue for heavy materials
Use rock glue, gravel adhesive, or gravel glue to stabilize pea gravel, crushed stone, river rock, or driveway gravel. Think materials that are weighty, gritty, and tend to migrate. Rock glue is basically a stone stabilizer or rock binder designed to hold up to heavier material and shift due to foot traffic.

PetraMax Rock Glue Max
Best for: Walkways, driveways, landscape borders, decorative stone areas, tree rings
Key features: Clear-drying, 100% water-permeable, non-toxic (zero VOCs/PFAS), pet & kid safe, holds 6–24 months, easy 2:1 water mix ratio
Availability: In stock — from $63.99 (1 gallon / covers 200 sq. ft.)
Buy ProductChoose Mulch Glue for lightweight organic coverage
Use a mulch glue or mulch sealant when you’re locking down any type of mulch, bark, wood chips, or pine straw. It’s a mulch adhesive or mulch binder meant to keep beds neat, reduce washout, and help your edges stay crisp.
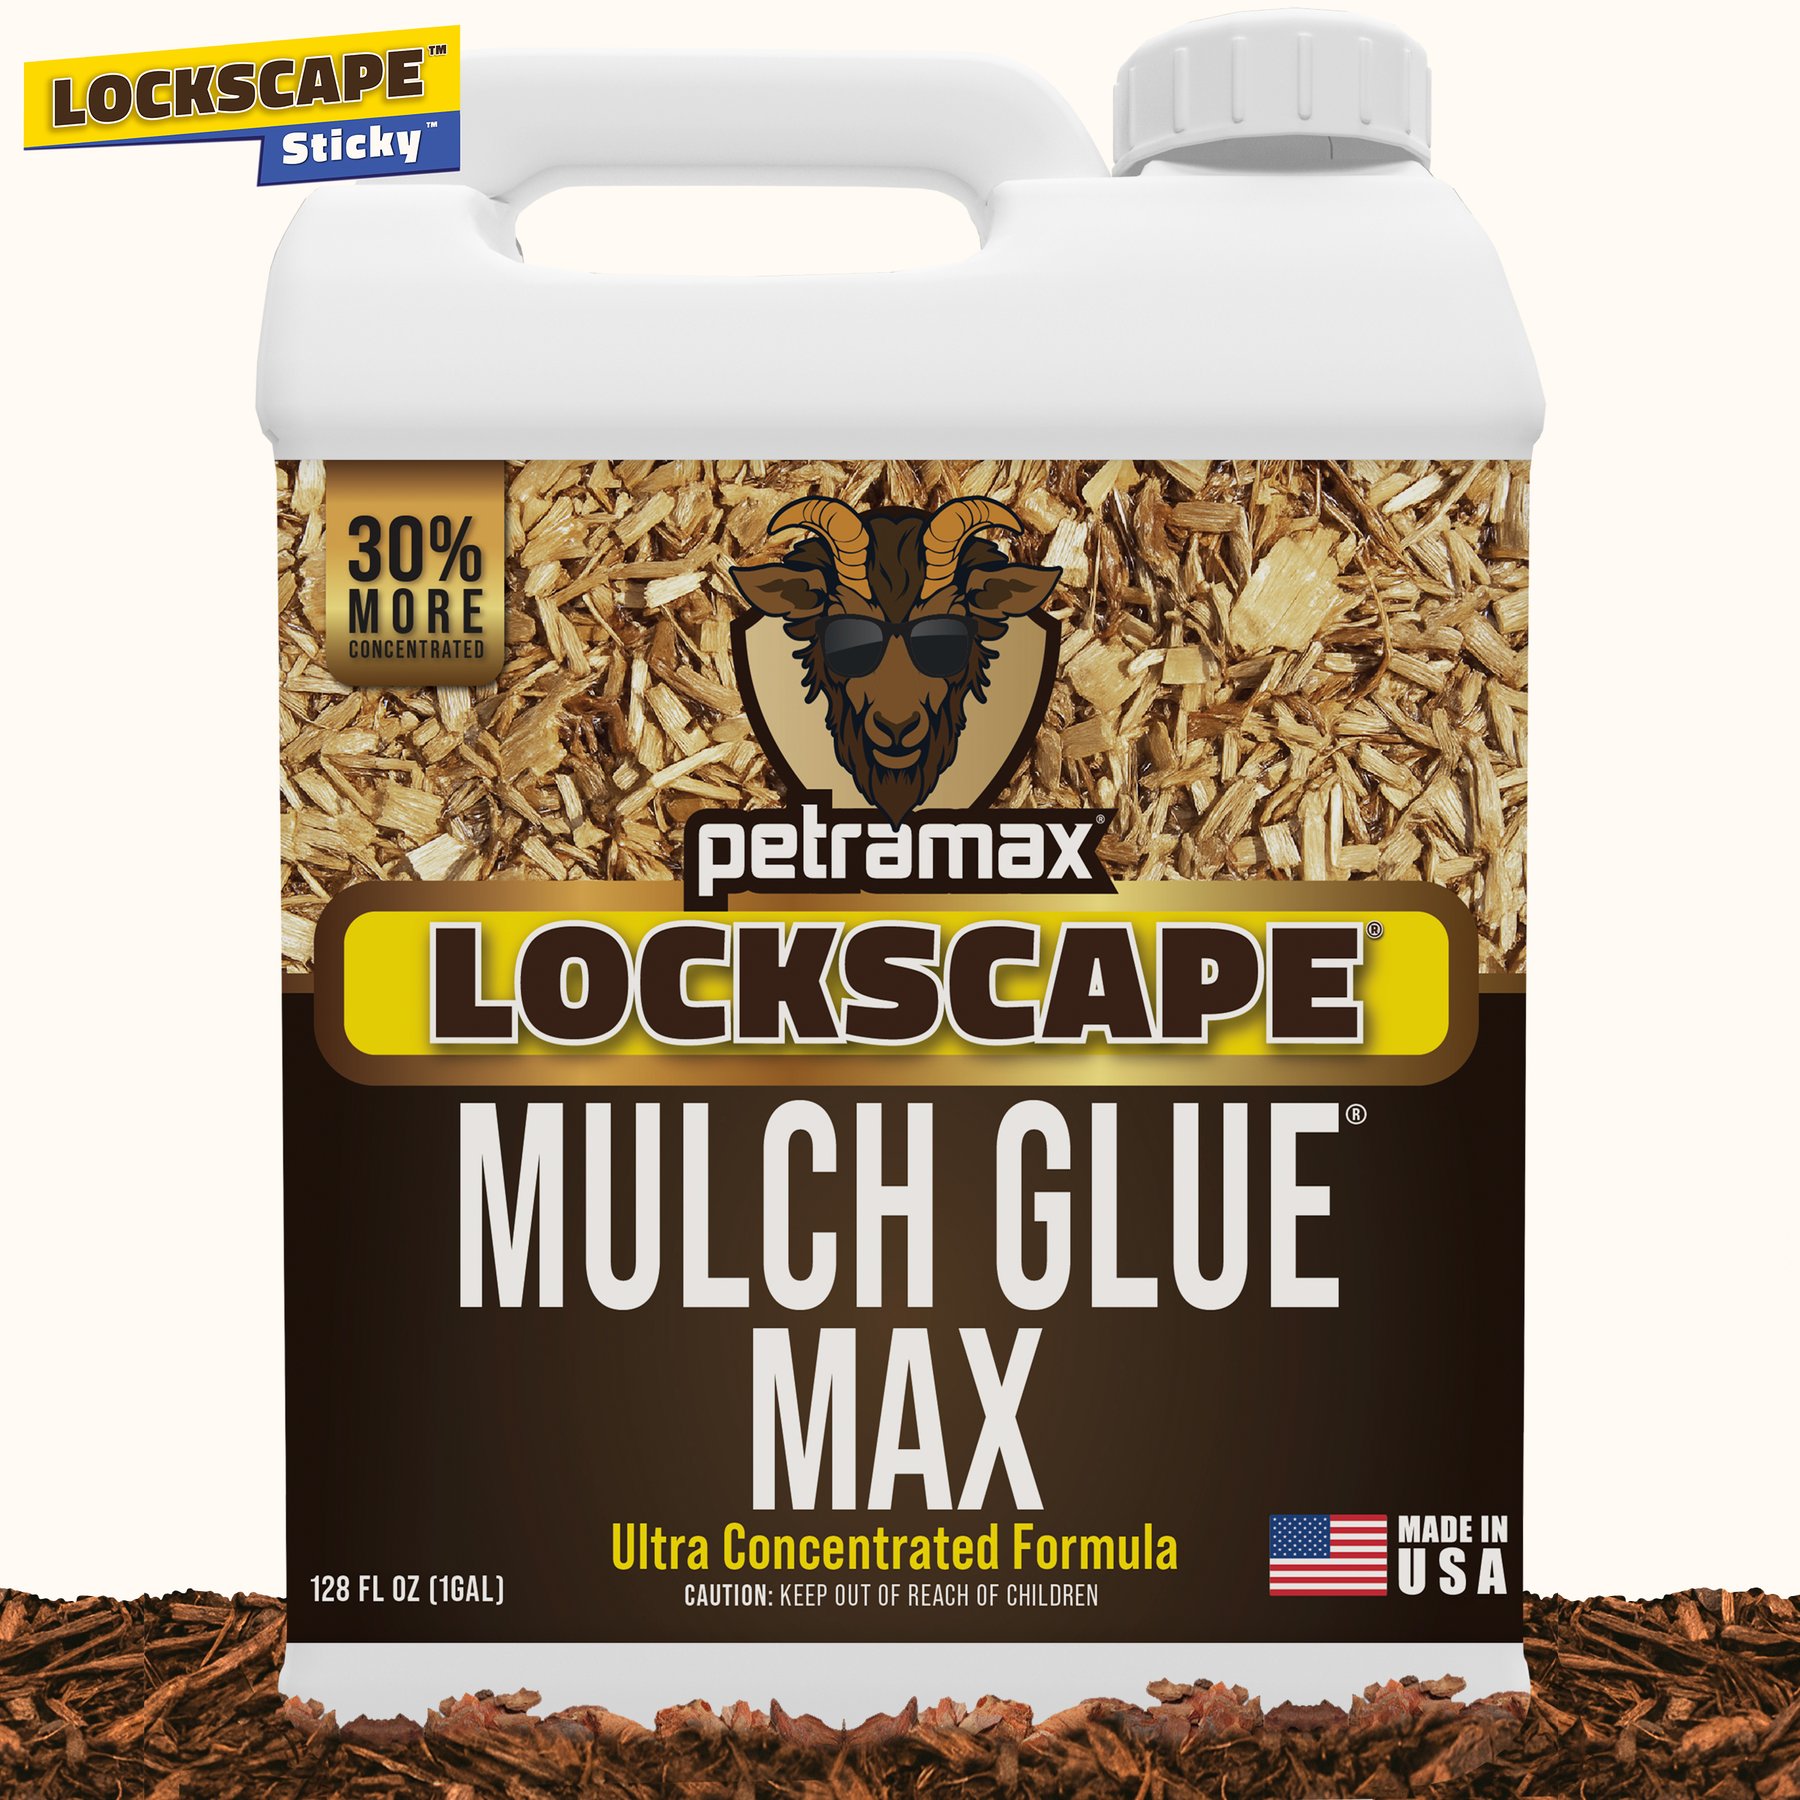
PetraMax Mulch Glue Max
Best for: Garden beds, tree bases, slopes, landscape borders, decorative stone areas
Key features: Holds 12–24 months, 50% stronger than standard adhesives, clear-drying, water-permeable, non-toxic, pet & kid safe once dry
Availability: In stock — from $72.99 (1 gallon / covers 100 sq. ft.)
Buy ProductIf you’re unsure: use the weight, traffic, and slope rule
Ask yourself three questions:
· Is the material heavy (rock) or light (mulch/pine straw)?
· Will people walk on it?
· Is it on a slope where washout happens?
If the material you want to lock down is heavy, walked on, or has sloped edges, rock glue is your best choice. If it’s lighter such as in landscaped areas, flower beds, or tree rings, and the area is susceptible to wind and washout, mulch glue is a more appropriate selection.
What Is a Landscape Adhesive?
What it is: a spray-on or mixed binder that locks material in place
A landscape adhesive is typically a liquid binder that you apply, mix with, or spray over the top of landscape material – gravel, pebbles, mulch, pine straw, etc. You may hear it referred to as gravel glue spray, spray glue for mulch, or just plain rock glue or mulch glue. While it is frequently applied over the material, in some cases, the binder solution can be mixed with the landscape material, stirred, and then spread over a designated area. Once it dries and cures, it helps lock or bind the pieces together at the surface, so there is less movement and less scatter. The result is a cleaner look requiring less upkeep and maintenance such as sweeping materials back into place.
With a strong adhesive, you’ll no longer have to say things like: “my mulch keeps washing away after rain”, “the wind blows mulch onto my walkways”, “my rocks keep moving off the path”, and “my dog tracks mulch everywhere”. A strong glue will help hold, bind, and lock down mulch and rocks reducing migration, washout, and drift.
What it is NOT: not concrete, not for vehicle traffic, not a permanent hardscape
This is important: landscape adhesive isn’t meant to replace pavers, mortar, or a driveway base. It’s not a structural fix or a permanent fix. It’s a surface-stabilizing solution that works best when the bed is already installed.
Rock glue vs mulch glue: why the formulas differ
Rock is heavier, sharper, and tends to grind against itself. Mulch is lighter, more porous, and moves more from wind and water than from abrasion. As a result, rock glue is generally best for stronger binding and better wear. Mulch glue aims for coverage, locking down mulch without turning your bed into a hard plastic sheet.
Additionally, and an often overlooked benefit of the adhesives and glues is that you can use a leaf blower to get rid of leaves and debris on top of rock, mulch, and other bedding materials without the material itself moving – this is a fantastic addition to landscape adhesive’s list of positives.
Rock Glue vs Mulch Glue: The Real Difference
The core difference (material weight, abrasion, hold strength)
If you remember one thing:
Rock glue is built for weight and abrasion. Mulch glue is built for blowout and washout control.
Best materials for rock glue
Rock glue is a better match for:
· pea gravel
· crushed stone
· small river rock
· decorative gravel paths
· driveway gravel edges (not the main driving surface)
Best materials for mulch glue
Mulch glue is a better match for:
· shredded mulch, nugget mulch, bark
· wood chips
·pine straw
·beds, borders, tree rings, and areas where you want a clean look
Where each one can fail
Preventing failure and ensuring desired results is not difficult, but you must avoid some application mistakes such as:
· Applying to wet material
· Using too thin of a coat and expecting miracles
· Applying right before rain
· Expecting it to hold up like concrete
· Spraying over dusty rock
Take a Quick Look at the Comparison:
| Category | Rock Glue / Gravel Adhesive / Gravel Binder | Mulch Glue / Mulch Adhesive / Mulch Stabilizer |
|---|---|---|
| Best For | Pea gravel, crushed stone, river rock, decorative gravel paths, gravel edging | Mulch beds, bark mulch, wood chips, pine straw, tree rings, flower beds |
| Main Job | Reduce rock migration | Reduce mulch washout, wind blowout, keeps beds tidy |
| Foot Traffic | Better for light foot traffic on paths or borders | Light foot traffic only, not a hard walking surface |
| Best on Slopes | Good if applied lightly, then adding additional coats, drifting rocks | Excellent for beds where mulch frequently washes out |
| Finish / Look | Smooth surface look | More natural bed look, shiny if overapplied |
| Most Common Mistakes | Applying over wet, or dirty rock, or before rain | Applying too thick or when mulch is wet |
| Sprayer Notes | Use clean sprayer and flush immediately after application | Use clean sprayer and flush immediately after application |
| Re-Application | Touch up foot traffic areas or weather beaten areas | Often seasonal refresh or retouch |
Best Uses: Where Each One Shines
Rock glue best uses
· Gravel walkways and decorative paths
· Rock borders that edge up against a lawn
· Problem areas where rocks migrate after storms
· Edges and slopes where rocks tend to drift
If your complaint is “rocks keep moving” or “my gravel won’t stay put,” rock glue is usually the tool.
Mulch glue best uses
· Mulch beds and flower beds
· Tree rings
· Windy corners of the yard
· Sloped beds that get washout
· Pine straw areas that never stay tidy
If your complaint is “mulch keeps washing away” or “wind blows mulch everywhere,” mulch glue is usually the move.
Special case: pea gravel patios and decorative stone
This is the one people argue about online: “mulch glue for pea gravel” or “can I use mulch glue on pea gravel?”
If you’re bonding rock, choose rock glue or a true gravel adhesive designed for that weight and friction. The results will be stronger which is what you need when working with any type of rock, pebble, or gravel.
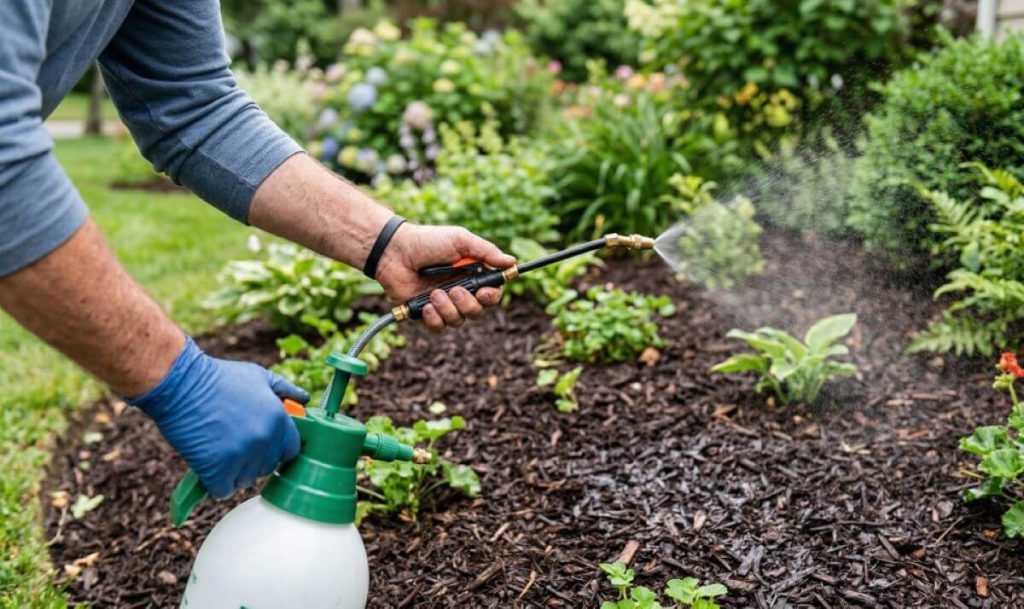
How to Apply Mulch Glue (Step-by-Step)
Prep first (clean debris, pull weeds, level, DRY mulch)
Mulch glue works best when your bed is already set:
· Edge the bed so your shape is clean
· Pull weeds and remove leaves/sticks
· Make sure mulch is dry (this matters more than people think)
· Fluff and level the mulch so you’re not spraying into low pockets
Protect nearby surfaces (mask edging, pavers, siding)
Mulch glue can leave a sheen if it hits pavers or stone. I like to:
· Mask hard edges if I’m being picky
· At least brush/sweep off nearby pavers after spraying
· Just be careful where I am spraying or applying to avoid overspray into areas that don’t need the glue
Apply in thin, even coats with a garden sprayer or pump sprayer
A common mistake is over-applying or the idea that more is better. You don’t want puddles. You want an even spray like you’re painting a light coat.
Let it dry, then apply additional coats if needed
If your bed is on a slope, super exposed to wind, or you just want a super strong hold, a second coat after the first dries can help.
Clean equipment thoroughly after application
A big problem when using mulch glue or rock glue is a clogged sprayer. You will frequently see “sprayer clogged” mentioned in online forums as a problem with these glues and adhesives. There is an easy fix to this issue: Whether you’re using a spray bottle or garden sprayer, flush your sprayer with clean water right away. Don’t let adhesive dry inside the nozzle or filter screen.
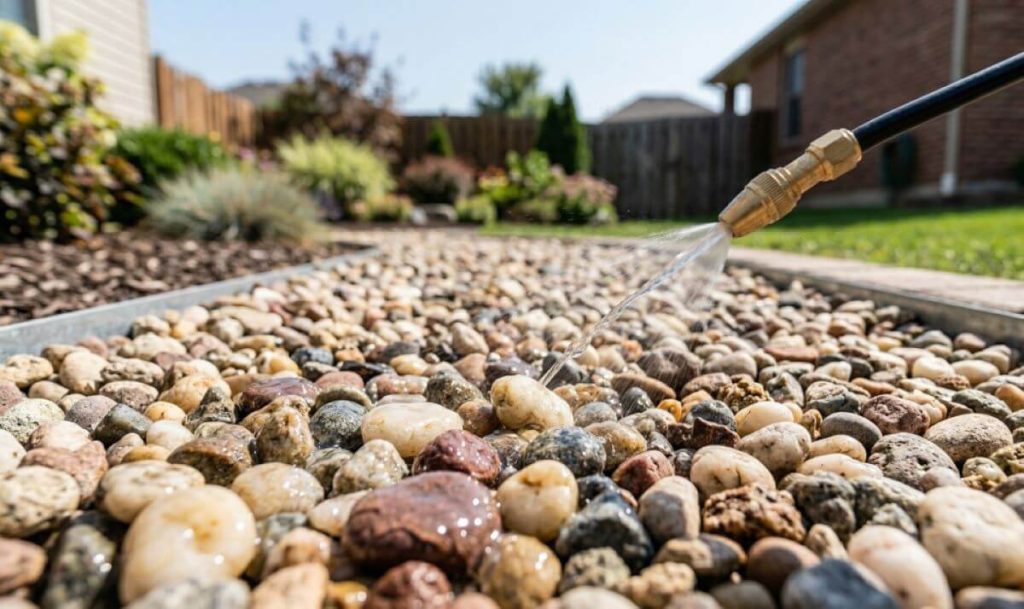
How to Apply Rock Glue (Step-by-Step)
Prep the rock (dry surface, remove fines/dust if possible)
If your rock is dusty, the glue bonds to dust, not stone. I like to:
· Lightly blow or rinse dust off earlier, then let it dry fully
· Make sure the rock is dry at application time – if you are using new gravel or rock, it is best to let it dry completely before spreading it and applying any glue on top of it or mixing any glue with it.
Apply a light tack coat first with a garden sprayer or handheld sprayer, then build
Rock glue works best in layers. Start with a light tack coat, let it set up, then add another light coat. This helps avoid clumps and gives a more natural finish.
Another common application type is mixing. Here, you can add rocks or gravel to a bucket, pour the glue directly onto the rocks, then thoroughly mix the glue with the rocks and spread onto an area. Once done, you need to press or flatten this mixture with a roller, finishing trowel, or similar flat tool which will help you press the mixture firmly into place before it dries.
Cure time and traffic rules
Light foot traffic is usually fine after full cure, but don’t rush it. Let it set. If you walk on it too early, you’ll break the bonding before it’s done. In my experience using various types of glues and adhesives, cure time is an essential key – too much drying or curing time is virtually impossible.
When rock glue is a bad fit
If you want a rock driveway surface that handles vehicles, that’s a base/prep issue, not a glue issue. Rock glue is best for borders, paths, and decorative areas, not heavy vehicle traffic.
Dry Time, Cure Time, and Weather Windows
The dry material and rain-free window rule
This is the number one success factor:
· All material needs to be dry
· You need a rain-free window
Typical dry time guidance and why humidity matters
Many products aim for a dry-to-touch period within hours, with fuller cure in a day. Humidity, shade, thickness, and temperature can stretch that timeline. You may find yourself saying, “It’s still tacky”. If so, it may be too thick or humidity and wetness are working against you. It will not hurt to give any type of adhesive extra curing time.
What to avoid (high humidity, rain, over-application)
If rain hits before it cures, people sometimes say: “It didn’t hold after rain.” This doesn’t mean it didn’t work, or that it’s not a good product. You need to plan ahead and pick a couple of dry weather days and follow the other directions carefully.
Coverage, Dilution, and How Much You Need
Ready-to-use vs concentrate and what it changes
Some adhesives are ready-to-use and some are concentrate. Concentrate can be cost-effective, but you have to follow the dilution ratio and apply correctly.
Coverage rate basics (beds vs gravel sections)
Mulch typically “drinks” more product than rock because it’s porous. Rock coverage can vary based on size and gaps.
How to estimate gallons for your project
A simple way:
1. Measure the square footage of the area
2. Decide how many coats you’ll apply (1 coat for mild areas, 2 for slopes/windy zones)
3. Check the label’s coverage estimate and buy according to the number of coats you want to apply
If you’re unsure, purchase more than you think you need. Nothing’s worse than stopping mid-bed.
Pros and Cons
Rock glue pros/cons
Pros: strong hold for heavy material, reduces rock migration, stabilizes walkways/borders
Cons: prep matters, can look uneven if over-applied, not intended for vehicle traffic surfaces
Mulch glue pros/cons
Pros: keeps beds tidy, reduces washout/blowout, helps maintain crisp edges, good for pine straw and light mulch
Cons: may need reapplication, can look shiny if overdone, not meant to make mulch “hard”
What most people don’t realize
It’s a binder, not a magic forcefield. It helps a properly installed landscape bed stay put longer. It doesn’t replace edging, depth, or drainage.
Longevity and Reapplication: Realistic Expectations
How long does it last?
This depends on:
· Rain exposure and slope
· Material depth and type
· Foot traffic and pets
· How many coats you used
If someone says, “lasted a season” or “I had to reapply yearly,” that’s not automatically a failure. That’s often normal maintenance for high-exposure beds.
When to reapply
A good pattern:
· Touch up trouble spots after storms
· Refresh seasonally if your yard gets hammered by wind/rain
What shortens lifespan (H3)
Heavy rain before cure, thin coverage, constant disturbance, and expecting it to hold deep loose material that’s not contained.
Weeds, Water, and Plant Health
Does mulch glue prevent weeds?
Mulch glue can help keep mulch in place, which can reduce openings where weeds pop through, but it’s not an herbicide.
Will it block water and air?
When applied correctly and according to the instructions, these adhesives are water-permeable, allowing water and nutrients to pass through. This means you can use it in flower beds or areas where plants, shrubs, or trees grow.
Is it safe around plants? (H3)
Yes, as long as you spray it onto the surface of the rock or mulch and not directly onto the plant’s leaves, it is safe and will not disrupt plant growth.
Safety: Kids, Pets, PPE, and “Non-Toxic” Claims
What to check on the label (H3)
Always follow label directions for:
· Gloves/eye protection (PPE)
· Cure time before kids/pets walk on it
· Surface warnings (pavers, painted surfaces, etc.)
“Is it toxic to the environment?”
That’s a commonly asked question. Most landscape adhesives are designed to be safe when used as directed.
What Customers Are Saying
PetraMax Mulch Glue Max
“After every heavy rain, my mulch used to wash out onto the sidewalk. I applied Mulch Glue Max once the bed was dry, and it held everything in place without turning the mulch hard or crusty. Huge time-saver.”
— Emily R., Charlotte, NC
PetraMax Rock Glue Max
“I used Rock Glue Max on decorative gravel along a walkway that kept shifting. The rocks locked together cleanly and still look natural. It’s held up through rain and wind issues.”
— Mark T., Denver, CO
See What Our Customer SayTroubleshooting
My sprayer clogged
Usually: dried product in the nozzle, filter screen, or sprayer line. Fix: flush immediately after use, clean screens, and don’t let adhesive sit in the sprayer.
It dried white / looks shiny
Often caused by heavy application or overspray onto hard surfaces. Fix: apply thinner coats, mask edges, test a small area first.
It didn’t hold after rain
Most common cause: it rained too soon or the material wasn’t dry. Fix: reapply on a dry day with a better cure window.
It bonded in clumps / uneven coat
Usually from spraying too close or too heavy. Fix: spray from a bit farther back and use lighter passes.
Can you walk on it?
After full cure, light foot traffic is usually fine for many setups, but heavy scuffing early can break the bond, so as previously stated, give it ample time to cure.
FAQ: Rock Glue, Mulch Glue, Landscape Adhesive
Mulch glue is a mulch binder (a type of landscape adhesive) that helps hold mulch, bark, pine straw, and similar materials in place so it doesn’t blow away with wind, wash out with rain, or scatter from leaf blowers and pets. It binds the particles together while remaining water-permeable, allowing moisture and air to reach the soil.
Yes, when applied correctly to dry mulch, in proper even coats, and with enough cure time in good weather. Most complaints come from applying on wet mulch, during rain-prone conditions, rushing the process, or expecting it to create a rock-hard surface like concrete — it’s designed to stabilize, not solidify completely.
Generally yes after full cure (usually 24 hours or more), but mulch glue isn’t meant to create a hard walking surface like pavers. It provides stabilization for light foot traffic. Rock glue or gravel-specific adhesives tend to handle foot traffic better on paths, borders, or high-use areas.
It might provide some light binding, but it’s not ideal for pea gravel or heavier rocks. Mulch glue is formulated for lighter organic materials like bark and pine straw. For pea gravel, decomposed granite, or stone paths, use a dedicated rock glue or gravel stabilizer/adhesive for better hold and durability under traffic.
Conclusion
Many lawn and landscape enthusiasts love rock glue and mulch glue. If you are experiencing rock migration, rocks on walkways or in lawns, choose a gravel adhesive, stone stabilizer, or rock glue. If you have bark mulch, pine straw, or similar bedding material that washes or blows away easily or frequently, choose a mulch binder, bark glue, or mulch glue. Regardless of which you choose, remember to choose a few rain-free days for application, apply thin coats, and always allow ample curing time.
Bottom Line: choose rock glue for stone and gravel, choose mulch glue for organic ground cover. Treat both as a landscape adhesive that works best with dry material and a proper cure window.